Welcome to KROCHETA, where we elevate the art of amigurumi from the whimsical to the sublime. We are thrilled to present our most intricate design yet: The Floral Queen Bee. This pattern is not just a tutorial; it is an exploration of advanced crochet techniques, meticulous tailoring, and high-fashion aesthetics.
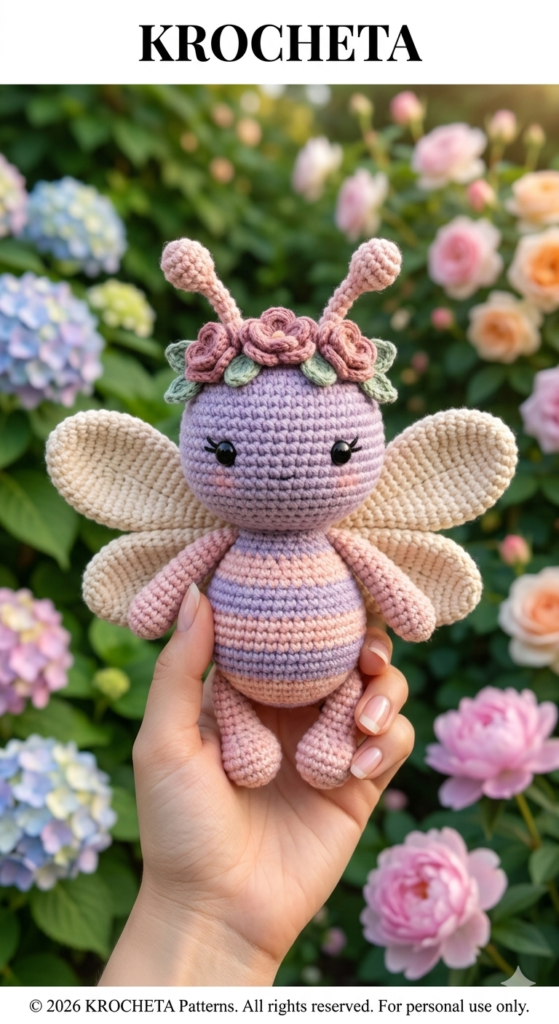
This stunning creation is more than just a doll; she is an embodiment of intricate craftsmanship and artistry. Marrying the whimsical charm of a floral garden with the sophistication of advanced amigurumi sculpting, this Queen Bee is designed to challenge and delight the advanced maker. Prepare to enter the world of haute couture amigurumi, where every detail, from the delicate floral crown to the sculpted limbs, is executed with surgical precision.
Visual Analysis
This design features a masterful interplay of texture and a refined color palette:
- Palette (using hex-style names):
- Body: ‘Lavender Bloom’ (A)
- Striped Dress/Upper Legs: ‘Petal Pink’ (B) and ‘Lavender Haze’ (C)
- Limbs and Headpiece: ‘Powder Pink’ (D)
- Wings: ‘Ecru Lace’ (E)
- Floral Crown: ‘Dusty Rose’ (F) and ‘Sage Leaf’ (G)
- Textures: The use of premium mercerized cotton gives the doll a soft yet defined structure. The complex headpiece offers a beautiful contrast of floral textures.
Quick Facts
- Skill Level: Advanced / Haute Couture
- Estimated Time: 25-30 hours
- Finished Size: Approx. 12 inches tall (to the top of the crown)
- Key Techniques: Soft Facial Sculpting, Precise Bust & Hip Shaping, Calf Modeling, Invisible Color Changes, Intermediate Hair Construction (Wig Cap).
THE HAUTE COUTURE PATTERN (The Core)
MATERIALS LIST
- premium mercerized cotton yarn in colors A, B, C, D, E, F, G. (approx 50g each, less for accent colors)
- Crochet hook: 1.75mm (US size 4/0 or similar) to achieve a high-end, tight stitch.
- Polyester stuffing (high quality, for detailed shaping).
- 10mm black safety eyes.
- Black and light pink embroidery floss.
- Thin gauge craft wire (optional, for leg and wing structure).
- Tapestry needle.
- Blush makeup brush and soft pink cosmetic blush.
PRECISION CONSTRUCTION
Special Stitch Instructions:
- Dec: Invisible decrease. Insert hook into front loops of the next 2 stitches, yarn over, pull through, yarn over, pull through last 2 loops.
- Inc: Work 2 sc in the same stitch.
1. HEAD (Lavender Bloom, Color A)
R1: 6 sc in a Magic Ring [6 sts]
R2: (inc) x 6 [12 sts]
R3: (1 sc, inc) x 6 [18 sts]
R4: (2 sc, inc) x 6 [24 sts]
R5: (3 sc, inc) x 6 [30 sts]
R6: (4 sc, inc) x 6 [36 sts]
R7: (5 sc, inc) x 6 [42 sts]
R8: (6 sc, inc) x 6 [48 sts]
R9-R16: sc in all 48 [48 sts] (8 rounds total)
R17: 12 sc, (1 sc, inc) x 4, 8 sc, (inc, 1 sc) x 4, 12 sc [56 sts] (Pre-sculpting checks)
R18-R20: sc in all 56 [56 sts] (3 rounds total)
- Safety Eyes: Insert between R16 and R17, with about 10 sts between them. Secure. R21: 12 sc, (1 sc, dec) x 4, 8 sc, (dec, 1 sc) x 4, 12 sc [48 sts] R22: 6 sc, (1 sc, dec) x 6, 6 sc, (dec, 1 sc) x 6 [36 sts] R23: 3 sc, (1 sc, dec) x 6, 6 sc, (dec, 1 sc) x 6 [24 sts] (Begin stuffing, focusing on cheeks) R24: (1 sc, dec) x 8 [16 sts] (Continue stuffing firmly) R25: (dec) x 8 [8 sts] Fasten off and close the remaining opening.
2. FACIAL SCULPTING (Advanced Technique)
Using a long tapestry needle and a double strand of the Lavender yarn:
- Enter the needle from the bottom opening of the head and exit near the inner corner of the right eye.
- Re-enter the needle 1 stitch below the eye.
- Exit the needle near the inner corner of the left eye.
- Re-enter 1 stitch below and exit out the bottom opening.
- Gently pull both yarn tails to sink the eyes slightly, creating eye sockets. Secure and hide yarn tails inside the head.
- Embroidery: With black floss, embroider delicate lashes on the outer corners of both eyes, as shown in the image. Add a tiny nose.
- Blush: Using a clean makeup brush, lightly apply pink blush to the cheek area just below the eyes.
3. CROWN & ANTENNAS (Powder Pink, Color D)
Rose Flowers (Color F – Dusty Rose) (Make 3):
- Ch 11.
- In 2nd ch from hook, (1 hdc, 1 dc, 1 hdc) in each ch to the end. Fasten off.
- Roll into a tight spiral and sew along the bottom edge to secure the rose shape.
Leaves (Color G – Sage Leaf) (Make 6):
- Ch 5. Starting in 2nd ch from hook, work: 1 sc, 1 hdc, 1 dc, (1 hdc, ch 1, 1 sc in 1st ch to make a picot) in last ch, now working down the other side of the ch: 1 dc, 1 hdc, 1 sc. Fasten off.
Antennas (Color D – Powder Pink) (Make 2):
- R1: 6 sc in a Magic Ring [6 sts]
- R2: inc in each sc [12 sts]
- R3: (1 sc, inc) x 6 [18 sts]
- R4: sc in each [18 sts]
- R5: (1 sc, dec) x 6 [12 sts]
- R6: (dec) x 6 [6 sts] (Stuff bobble tip)
- R7-R12: sc in each [6 sts] (6 rounds) Fasten off, leaving a tail for sewing.
- Assembly: Sew the flowers and leaves to a simple crocheted chain headband. Sew the antennas to the head, positioned just behind the crown.
4. WINGS (Ecru Lace, Color E) (Make 4: 2 Right, 2 Left)
(Note: These are crocheted in rounds. The shape is the same for all 4, they are positioned symmetrically.)
R1: 6 sc in a Magic Ring [6 sts]
R2: inc in each [12 sts]
R3: (1 sc, inc) x 6 [18 sts]
R4: (2 sc, inc) x 6 [24 sts]
R5: (3 sc, inc) x 6 [30 sts]
R6: (4 sc, inc) x 6 [36 sts]
R7-R9: sc in all 36 [36 sts]
R10: (4 sc, dec) x 6 [30 sts]
R11: (3 sc, dec) x 6 [24 sts]
R12: (2 sc, dec) x 6 [18 sts]
R13: (1 sc, dec) x 6 [12 sts]
R14-R16: sc in all 12 [12 sts]
R17: dec x 6 [6 sts]
Fasten off and sew to the back of the doll’s body, ensuring perfect symmetry.
5. THE HAUTE COUTURE BODY & ARMS (Striped Dress & Body, Colors B & C)
The dress uses alternating colors (B – Petal Pink, C – Lavender Haze) every 2 rounds, starting with Color B.
R1: (Color B) 8 sc in a Magic Ring [8 sts]
R2: inc in each [16 sts]
R3: (1 sc, inc) x 8 [24 sts]
R4: (2 sc, inc) x 8 [32 sts]
R5: (3 sc, inc) x 8 [40 sts]
R6: (4 sc, inc) x 8 [48 sts]
R7: (5 sc, inc) x 8 [56 sts]
R8: (Color C) sc in all 56 [56 sts]
R9: sc in all 56 [56 sts]
R10: (Color B) (5 sc, dec) x 8 [48 sts]
R11: sc in all 48 [48 sts] (Begin stuffing firmly)
R12: (Color C) (4 sc, dec) x 8 [40 sts]
R13: sc in all 40 [40 sts]
R14: (Color B) (3 sc, dec) x 8 [32 sts]
R15: sc in all 32 [32 sts]
R16: (Color C) 2 sc, dec, 1 sc, dec, 16 sc, dec, 1 sc, dec, 2 sc [28 sts] (Precise Waist Tapering)
R17: sc in all 28 [28 sts]
R18: (Color B) (dec, 10 sc, dec) [26 sts]
R19: (Bust Shaping) sc 8, (inc) x 2, sc 6, (inc) x 2, sc 8 [30 sts]
R20: (Color C) sc in all 30 [30 sts]
R21: sc in all 30 [30 sts]
R22: (Color B) sc 8, (dec) x 2, sc 6, (dec) x 2, sc 8 [26 sts]
R23: (dec, 9 sc, dec, 11 sc) [24 sts] (Align with leg joins later)
R24: (Color C) (dec) x 12 [12 sts]
R25: sc in all 12 [12 sts]
Fasten off, leaving a long tail to sew to the head. The remaining opening on the head (8 sts) will be sewn to this neck opening. Use an invisible stitch for joining.
6. ARMS (Powder Pink, Color D) (Make 2)
(Precise instructions for EVERY round)
R1: 6 sc in a Magic Ring [6 sts]
R2: inc in each [12 sts]
R3-R5: sc in all 12 [12 sts]
R6: dec, 10 sc [11 sts]
R7: sc in all 11 [11 sts]
R8: dec, 9 sc [10 sts]
R9: sc in all 10 [10 sts]
R10: dec, 8 sc [9 sts]
R11-R20: sc in all 9 [9 sts]
Fasten off. Leave a tail for sewing. Position and sew to the sides of the body between R22 and R23, aligning with the bust shaping for a professional look. Do not just repeat for other arm. Make two identical arms following these exact rounds.
7. LEGS (Colors B, C, D) (Make 2: Left and Right)
Legs feature striped « stockings » (B, C every 2 rounds) and advanced calf modeling.
Start with Color B (Petal Pink):
R1: 6 sc in a Magic Ring [6 sts]
R2: inc in each [12 sts]
R3: (1 sc, inc) x 6 [18 sts]
R4-R10: sc in all 18 [18 sts] (Foot and lower calf)
R11: (dec, 1 sc) x 6 [12 sts]
R12: (dec) x 6 [6 sts] (Close the bottom of the foot)
R13: (dec, 1 sc) x 2 [4 sts] (Tapered heel)
- Switch to Color D (Powder Pink) for Leg: R14: Rejoin yarn at heel. 1 sc, ch 6. Skip the closed foot and slip stitch to the opposite side (top of ankle). R15: sc in each ch, working around the open section to create the ankle [12 sts] (Stuff the foot firmly) R16-R19: (Color D) sc in all 12 [12 sts]
- If using wire, insert a folded wire frame now. R20: (Color C) 2 sc, dec, 1 sc, dec, 3 sc, dec, 1 sc, dec [8 sts] R21: sc in all 8 [8 sts] R22: (Color B) (dec, 1 sc) x 2, 2 sc [6 sts] (Knee shaping, position decals accordingly) R23: sc in all 6 [6 sts] R24: (Color C) inc in each [12 sts] R25: sc in all 12 [12 sts] R26: (Color B) (1 sc, inc) x 6 [18 sts] R27: sc in all 18 [18 sts] R28: (Color C) (dec) x 9 [9 sts] R29-R30: sc in all 9 [9 sts] R31: dec x 4, sc [5 sts] R32: sc in all 5 [5 sts] Fasten off and sew to the body. Do not repeat for other leg. Make two identical legs following these exact rounds, and ensure symmetrical placement on the body.
8. MATERIALS & ASSEMBLY PRO GUIDE
- Reinforcement: To prevent a floppy neck, insert a single thick wire or a plastic support through the body and neck before sewing on the head. If using wire in the limbs, wrap it with tape to avoid poking through the yarn.
- Invisible Joining: Always use an invisible stitch for joins (e.g., matching the V-loops). The neck-to-head join must be seamless.
- Symmetry Check: Before sewing the wings or limbs, pin them in place first to ensure absolute symmetry. This doll requires a perfect look to be considered high-fashion.
- Final Polish: Re-check all details and apply a final light dusting of blush to the cheeks if needed. Ensure the lashes are distinct.
Enjoy your high-fashion masterpiece!
© 2026 KROCHETA Patterns. All rights reserved. For personal use only. The pattern, images, and design are the intellectual property of KROCHETA.