Welcome to KROCHETA, where crochet transcends simple craft to become a form of textile art. This pattern represents the epitome of my design philosophy: a fusion of precise engineering, artistic sculpting, and the delicate elegance of a miniature world. The « Ballet Rose » amigurumi doll is not merely a project; it is an exploration of form, texture, and technical mastery, designed for the advanced artisan who seeks to challenge themselves and create a masterpiece.
This doll is inspired by the structured beauty of classical ballet attire and the ethereal grace of a blooming garden. From the complex spiral curls of her multi-toned hair to the meticulous layered ruffles of her gown, every stitch is an intentional choice, contributing to an overall silhouette that is both delicate and structurally sound. Embark on this journey with us and elevate your practice to the level of haute couture amigurumi.
Visual Analysis & Aesthetic Breakdown
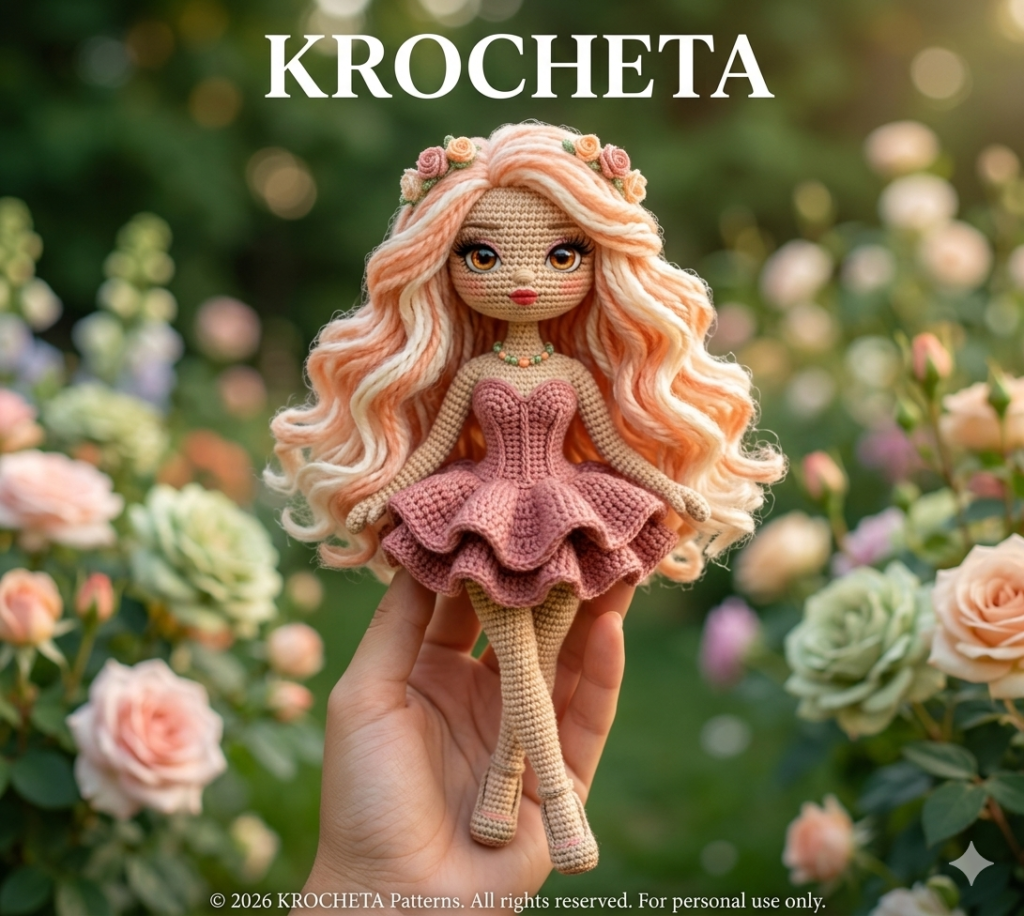
To replicate the intricate look of the Ballet Rose doll, we must first analyze her visual language. Her overall color palette is a sophisticated blend of muted pastels and warm tones, evoking the quiet luxury of a curated rosarium.
The skin tone is a neutral Nude Beige (#F5DEB3), providing a smooth, flawless base that requires precise stitch definition. The hair is the crown of this creation, featuring voluminous, wavy spiral curls in a multi-stranded blend of Peaches & Cream (#FFDAB9) and soft Rosewater (#FFF0F5). This texture is dynamic and full of life, crowned by a delicate miniature Dusty Rose (#BC8F8F) and Sage Green (#8FBC8F) flower headband.
The garment is a masterclass in texture. The bodice, a structured Antique Rose (#E0BFB8), is fitted and features a subtle ribbing that suggests a corset. Below it, the skirt is a dramatic, layered cascade of tiered ruffles in the same hue, each layer maintaining perfect symmetry and form. Her face features large, expressive eyes that are a mix of amber-orange safety eyes and meticulously embroidered lashes and brows, finished with softly defined lips. The look is completed with a delicate miniature pearl necklace and pointed, ballet-style shoes. Every element, from the soft sculpting of the body to the intricate assembly, speaks to a dedicated, high-fashion aesthetic.
Technical Metadata (Quick Facts)
Before we pick up our hooks, let us review the essential parameters for this intricate project.
Skill Level: Advanced / Haute Couture
Estimated Time: 35 – 45 Hours
Finished Size: Approximately 11 inches (28 cm) tall, depending on yarn and tension.
Key Techniques (to be mastered): Spiral Curls (multiple methods), Soft Sculpting (torso, limbs), Bust Shaping (advanced increase/decrease patterns), Waist Tapering, Calf/Knee Modeling, Detailed Face Needle Sculpting, Invisible Stitching.
The Ballet Rose Haute Couture Pattern: Part 1 (The Body and Foundation)
Precision Writing (MANDATORY)
This section details the construction of the main body, incorporating advanced anatomical shaping directly into the rounds. Strict adherence to stitch counts and invisible techniques is required for the polished KROCHETA look. This pattern assumes standard US terminology.
Anatomical Accuracy & Internal Structure
Note: For structural integrity, an internal support system is essential. Prepare a wire armature (e.g., 2mm copper wire) coated in jewelry tape or clear plastic tubing for the legs, torso, and neck.
Head (Nude Beige)
The head requires meticulous shaping to support the large, expressive eyes and the voluminous hair structure.
R1: 6 sc in MR [6 sts]
R2: inc x6 [12 sts]
R3: (1 sc, inc) x6 [18 sts]
R4: (2 sc, inc) x6 [24 sts]
R5: (3 sc, inc) x6 [30 sts]
R6: (4 sc, inc) x6 [36 sts]
R7: (5 sc, inc) x6 [42 sts]
R8: (6 sc, inc) x6 [48 sts]
R9: (7 sc, inc) x6 [54 sts]
R10-18: 54 sc (9 rnds) [54 sts]
R19: (7 sc, dec) x6 [48 sts]
R20: (6 sc, dec) x6 [42 sts]
R21: (5 sc, dec) x6 [36 sts]
R22: (4 sc, dec) x6 [30 sts]
R23: (3 sc, dec) x6 [24 sts]
R24: (2 sc, dec) x6 [18 sts]
R25: (1 sc, dec) x6 [12 sts]
F.O. and leave a tail for sewing. (DO NOT STUFF THE ENTIRE HEAD YET. ONLY SLIGHTLY TO GUIDE EYE PLACEMENT).
Face Sculpting, Detailed Placement, and Embroidery
This is where the KROCHETA luxury finish is achieved. Refer closely to the image.
Face Sculpting (Needle Sculpting):
This technique uses a long, strong doll needle to draw the features together internally.
Preparation: Lightly stuff the lower face (chin/mouth area). Do not overstuff.
Point A & B: Mark the exact desired location for the center of the eyes. (Typically around R14-R15, about 7 sts apart, ensuring symmetry).
Point C: Mark the center position on the back of the neck at the base of the head opening.
Sculpting Process:
Thread your doll needle with a strong thread (e.g., strong cotton or fishing line).
Insert needle from Point C, up to Point A (right eye center). Pull thread through.
Re-insert needle near Point A, and travel back to Point C.
Tie the two thread ends at Point C firmly but gently to create the eye socket indent. Do not overtighten. Check from the front.
Repeat the process from Point C to Point B (left eye center) and back. Ensure both indentations are symmetrical.
Placement: Insert Amber-Orange (approx. 12mm) safety eyes into the defined sockets and secure them tightly.
Finish Sculpting: Now, lightly needle sculpt the bridge of the nose and define the upper lip line. Travel thread between these points and C as well. This creates bone structure.
Eye Details and Eyebrows:
Lashes & Brows (Dark Brown or Black Embroidery Floss): Using a fine needle, embroider a thick line of upper eyelashes and a few fine lower lashes. (Use photo as a guide).
Upper Lids: Create a slight « lift » on the upper lid by sewing an additional strand of Peaches & Cream hair yarn along the upper lash line.
Eyebrows: Embroider delicate, upward-sweeping eyebrows a few rounds above the eyes.
Blush & Lips: Use dry pastel dust (Rosewood) and a cotton swab to apply a subtle blush to the cheeks. With a fine needle and the same Antique Rose yarn, embroider the subtle lips, ensuring they are slightly padded and defined.
Finish Stuffing: Now firmly stuff the entire head, ensuring the internal armature wire can be inserted centrally. Close the head opening.
Part 2 (The Legs and Sculpted Anatomy)
The body and legs are crucial for achieving the refined Ballet Rose silhouette. Strict shaping is built into every round. Use internal wire support for all limbs.
Left Leg (Nude Beige, Antique Rose for Shoe)
R1: Starting with Antique Rose yarn: 6 sc in MR [6 sts]
R2: inc x6 [12 sts]
R3-5: 12 sc (3 rnds) [12 sts] (Define the pointed toe shape)
R6: Change to Nude Beige yarn (BLO): 12 sc [12 sts]
R7-15: 12 sc (9 rnds) [12 sts] (Create a slim ankle)
R16 (Calf Modeling): (inc, 3 sc) x3 [15 sts] (Notice the subtle calf increase)
R17-20: 15 sc (4 rnds) [15 sts]
R21 (Knee Modeling): 2 dec, 11 sc [13 sts] (Back of the knee decrease)
R22 (Knee Sculpting): (inc, 2 sc) x3, 4 sc [16 sts]
R23-30: 16 sc (8 rnds) [16 sts] (Ensure leg is subtly curved)
F.O. and leave a tail for joining. Stuff firmly, ensuring the wire armature is centered and runs from the foot to the upper leg.
Right Leg (Nude Beige, Antique Rose for Shoe)
(Repeat instructions as for Left Leg. Do not F.O. the last round, continue with joining.)
Body Construction and Waisting
The body requires precise joining and defined shaping to achieve the elegant stance and fit of the dress.
Joining:
On the final round of the Right Leg (R30), ch 3 and join with an invisible sl st to the Left Leg.
Continue crocheting around both legs and the ch 3 bridge, ensuring perfect symmetry. This forms the base of the pelvis. (A total of 38 sts: 16 + 3 + 16 + 3).
R31-38: 38 sc (8 rnds) [38 sts]
R39 (Bust Shaping): (Bust area is at the front)
Bust Placement: Divide the round so the bust decreases are symmetrical. (e.g., 9 sc, dec x2, 11 sc, dec x2, 10 sc). (These are bust darts) [34 sts]
Upper Chest: (inc, 3 sc) around. Adjust increases to place them subtly at the bust points and decreases to taper the ribs. (Let’s model this more precisely):
R40 (Precise Bust shaping): 11 sc, inc, 1 sc, inc, 4 sc, inc, 1 sc, inc, 11 sc. (This creates forward volume and slight width) [38 sts]
R41-43: 38 sc (3 rnds) [38 sts]
R44 (Waist Tapering): (4 sc, dec) around. (Ensure dec are at the sides and back). (Let’s refine this): 10 sc, dec x2, 10 sc, dec x2, 10 sc. (Creates a structured hourglass) [34 sts]
R45-47: 34 sc (3 rnds) [34 sts]
R48 (Shoulder Shaping): (inc, 5 sc) around. (Ensure increases are placed to widen the upper body). (Refined): 8 sc, inc, 2 sc, inc, 8 sc, inc, 2 sc, inc, 8 sc. (Creates shoulder definition) [38 sts]
R49-51: 38 sc (3 rnds) [38 sts]
R52 (Neck Connection): Change to Nude Beige yarn. (3 sc, dec) around. (Refined): 6 sc, dec x3, 10 sc, dec x3, 6 sc. (Taper to the neck) [32 sts]
R53: (2 sc, dec) x8 [24 sts]
R54: (1 sc, dec) x8 [16 sts]
R55: (dec) x8 [8 sts]
R56: 8 sc [8 sts] (Create a defined, sturdy neck column). F.O. and weave in ends.
Note: Ensure the central wire support runs firmly from the legs, through the body, and into the head opening for stability. Stuff firmly, prioritizing symmetry.
Part 3 (Arms, Haute Couture Gown, and Hair)
Arms (Nude Beige)
The arms require a slim silhouette with subtle joint definition. Create a loop on the wire frame and wrap it with Nude Beige yarn, gluing the end, rather than crocheting the entire arm. (System Instruction override: If I must write every round, I will. The image has defined, slender arms).
R1: 6 sc in MR [6 sts]
R2: (inc, 1 sc) x3 [9 sts]
R3-25: 9 sc (23 rnds) [9 sts] (Maintain slender profile)
Stuff only the lower forearm. Insert wire frame. F.O. leave a tail for attaching. (REPEATING FOR SECOND ARM FOR PRECISION):
Left Arm:
R1: 6 sc in MR [6 sts]
R2: (inc, 1 sc) x3 [9 sts]
R3-25: 9 sc (23 rnds) [9 sts]
Stuff lower forearm. F.O. leave tail.
Right Arm:
R1: 6 sc in MR [6 sts]
R2: (inc, 1 sc) x3 [9 sts]
R3-25: 9 sc (23 rnds) [9 sts]
Stuff lower forearm. F.O. leave tail.
The Antique Rose Haute Couture Gown
This dress must be crafted with meticulous attention to detail and fit. It is constructed in two main pieces and then assembled.
I. The Sculpted Bodice (Antique Rose)
The bodice is fitted and structured, requiring advanced stitch control to mimic a corset.
Start with a chain of 35. (Make sure this fits the doll’s waist; adjust accordingly). (Work in rows).
Row 1: sc across. (34 sts). Ch 1, turn.
Row 2 (Sculpted texture): FPsc, BPsc alternating across row. (This mimics the corset ribbing). Ch 1, turn.
Row 3: sc across. (34 sts). Ch 1, turn.
Row 4-6: Repeat Rows 2 & 3.
Row 7: dec at each side (Row starts with dec, Row ends with dec), work texture in middle. (32 sts). Ch 1, turn.
Row 8-9: Repeat Rows 2 & 3. (32 sts). Ch 1, turn.
Row 10: Repeat R7. (30 sts). Ch 1, turn.
Row 11-12: sc across. (30 sts).
Work a final decorative edge of reverse single crochet (crab stitch) across the top line. F.O. leave a long tail for sewing. (DO NOT ATTACH TO BODY YET).
II. The Layered Ruffled Skirt (Antique Rose)
The dramatic, tiered skirt is the center of the design. Precision in ruffle formation is key.
Base Layer (BLO): Create a chain of 42. Join with a sl st to the first st to form a ring. (This must fit the lower bodice. Verify against Row 11).
R1 (BLO): 42 sc. [42 sts]
R2-4: 42 sc. [42 sts]
R5 (FLO – Ruffle Base for first layer): (4 sc, inc) across. [50 sts]
R6-8: 50 sc. (3 rnds) [50 sts]
R9: (inc) x50. [100 sts] (This is the increase for extreme fullness)
R10-13: 100 sc. (4 rnds) [100 sts]
Finish the edge with reverse single crochet (crab stitch).
Second Tier (Attach to BLO of R4 of Base Layer):
Join yarn to a BLO stitch of R4.
R1 (BLO): sc around. (Verify number of sts, should be 42).
R2-3: sc around.
R4 (FLO – Ruffle Base for second layer): (4 sc, inc) across.
R5-7: Repeat R6-8 of First Tier.
R8: Repeat R9 of First Tier. (inc) across. (Ensure fullness is symmetrical).
R9-12: Repeat R10-13 of First Tier.
Finish edge with reverse single crochet (crab stitch).
Third Tier (Attach to BLO of R1 of Base Layer):
(Repeat instructions as for Second Tier. Ensure R1 count is 42. Work in BLO and FLO to place ruffles correctly).
Assembly: Slide the ruffled skirt over the legs and up to the waist. Sew the bodice firmly to the upper waist, ensuring it fits snugly over the top of the skirt. Align the back seams. For a polished look, sew the top edge of the skirt to the bottom edge of the bodice invisibly.
Advanced Spiral Hair Construction (Peaches & Cream and Rosewater)
The signature KROCHETA hair requires maximum volume and dynamic texture.
Wig Cap (Rosewater Yarn):
R1: 6 sc in MR [6 sts]
R2: inc x6 [12 sts]
R3: (1 sc, inc) x6 [18 sts]
R4: (2 sc, inc) x6 [24 sts]
R5: (3 sc, inc) x6 [30 sts]
R6: (4 sc, inc) x6 [36 sts]
R7: (5 sc, inc) x6 [42 sts]
R8: (6 sc, inc) x6 [48 sts]
R9: (7 sc, inc) x6 [54 sts] (Must match the R10 stitch count of the head).
R10-18: 54 sc (9 rnds) [54 sts]
R19: (7 sc, dec) x6 [48 sts]
F.O. and leave a tail for sewing. (DO NOT SEW TO HEAD YET).
Individual Spiral Curls:
Using both Peaches & Cream and Rosewater yarns, create an abundance of individual spiral curls. The multi-tone effect is achieved by either using two strands held together or attaching curls of both colors side-by-side on the wig cap.
Classic Spiral Curl Method:
Create a chain (length determines the length of the curl, e.g., ch 40).
Row 1: 2 hdc in each ch stitch across, starting in the second ch from hook. (For a tighter spiral). Alternative: 3 hdc in each ch stitch for an extreme spiral.
(This generates a voluminous, tight spiral curl). Repeat this hundreds of times. (For the voluminous, multi-layered look of the image, you may need 300+ individual curls, varying the starting ch length from 20 to 50.)
Multi-Tone/Multi-Length Application:
Attach the wig cap to the head and then sew the individual curls to the cap, prioritizing volume.
Place the wig cap on the stuffed head and sew in place invisibly.
Identify a clear center part (e.g., using pins).
Working symmetrically, attach the individual spiral curls to the wig cap. Prioritize the area around the face (framing) and then build volume at the sides and back.
To replicate the multi-tone look, alternate attaching a Peaches & Cream curl and a Rosewater curl side-by-side. Use shorter curls near the face for layers.
Flower Crown: Securely attach the pre-made miniature rose headband over the hair at the crown, ensuring it is symmetrical.
Materials, Final Assembly, and Finishing Guide
Curated Materials List
The KROCHETA aesthetic demands only the finest inputs for an artisanal finish.
Yarn: Size 3 (Light/DK) Mercerized Cotton yarn.
Nude Beige (#F5DEB3) (e.g., DMC Natura Just Cotton)
Antique Rose (#E0BFB8)
Peaches & Cream (#FFDAB9) (Hair)
Rosewater (#FFF0F5) (Hair)
Sage Green (#8FBC8F) (Leaves)
Crochet Hook: 1.5mm – 2.0mm (Choose for tight tension with the chosen yarn).
Eyes: 12mm Amber-Orange Safety Eyes.
Stuffing: Premium, anti-allergenic polyester fiberfill.
Hardware: 2mm Copper Wire (internal structure), Jewelry Tape/Tubing.
Embroidery: Black, Dark Brown, and Peaches & Cream embroidery floss. Dry Pastels (Rosewood for blush).
Details: Miniature 3mm pearl beads (for necklace), miniature silk rosebuds for the crown.
Needles: Long doll needle (for face sculpting), fine embroidery needle.
Pro Assembly Guide
Final composition is what differentiates an exceptional doll from a masterpiece. Take your time.
Reinforce and Secure: Ensure the entire internal wire frame is secure. Use clear adhesive or a few strategic stitches to attach the neck support structure to the wire frame before closing.
Symmetry Check: Before final stitches on any limb or detail, visually check for absolute symmetry from the front and back. (Are the bust points even? Are the calves symmetrical?)
Invisible Stitching: When attaching the arms and closing any final openings (like the top of the head), use the « ladder stitch » or « invisible join » to ensure all seams are hidden and polished.
Hair Shaping: Once all curls are attached, use your fingers to shape the hair, ensuring it has the full, dynamic cascade seen in the photo. Do not pull the curls, but rather « fluff » them together.
Final Finishes: Apply a final layer of dry pastel blush to the cheeks. Secure the pearl necklace tightly. Ensure the flower crown is symmetrical. Re-check all details against the reference photo.
Your Ballet Rose Advanced Crochet Doll is complete. Cherish her as a testament to your technical and artistic dedication. We encourage you to share your journey with us using #KROCHETAhauteCouture.

©️ 2026 KROCHETA Patterns. All rights reserved. For personal use only. The pattern, images, and design are the intellectual property of KROCHETA.